
Some websites pull your attention away the moment you open Safari. Others are simply not safe for kids. The good news is that every iPhone, iPad, and Mac already has a free tool that can block them: Screen Time.
This guide shows you how to block websites on Safari using only Apple’s built-in settings. No apps. No downloads. Just a few taps. You will learn how to block specific sites, filter adult content, lock everything except approved sites, protect your settings with a passcode, and fix the most common problems people run into.
What Website Blocking in Safari Actually Means
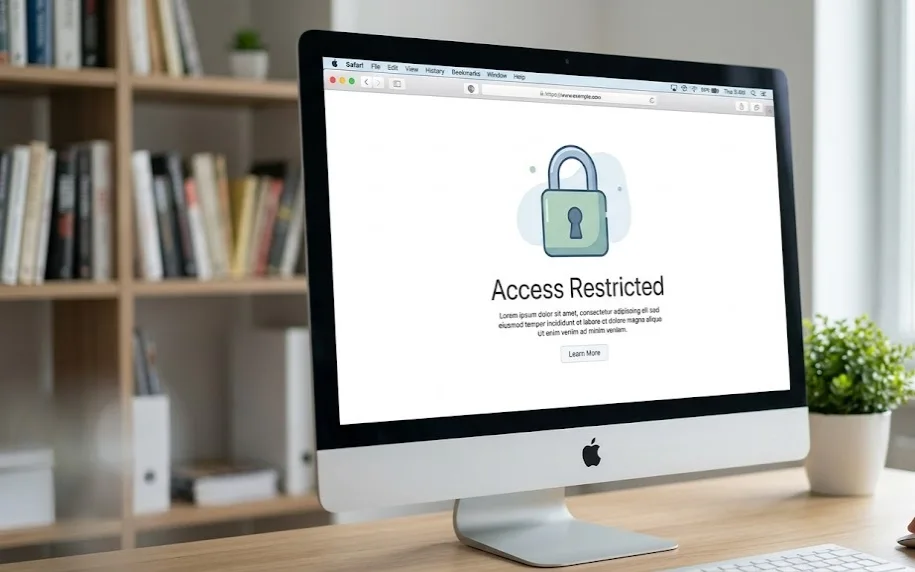
Blocking a website in Safari means Safari refuses to load that page. When someone tries to open it, they see a message that the site is restricted instead of the normal web page.
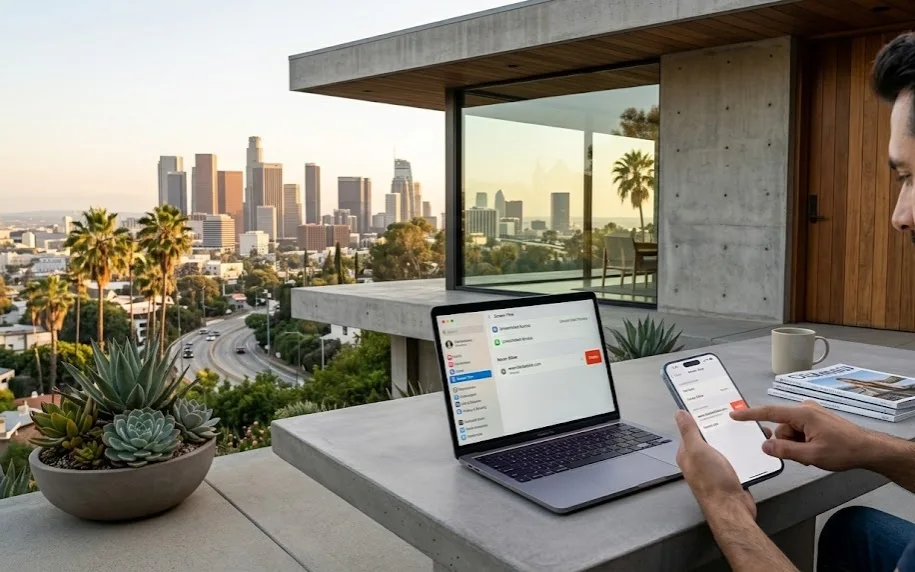
Apple handles this through Screen Time, a feature found in your device Settings. Inside Screen Time is a section called Content & Privacy Restrictions. This is where all web filtering lives. You can use it to:
- Block one or more specific websites you choose.
- Filter out most adult websites automatically.
- Allow only a short list of approved sites and block everything else.
People reach for this tool for a few simple reasons. Parents use it to keep children away from harmful pages. Students and remote workers use it to cut out time-wasting sites during study or work hours. Teachers use it to keep school iPads focused on learning. And many people just want fewer distractions on their own devices.
The best part is that these controls are built in. You do not need to install anything or pay for a subscription.
How Screen Time Website Restrictions Work
Before you start, it helps to understand the three web content modes Screen Time offers. They sit under one menu, and choosing the right one saves you a lot of effort.
| Web Content option | What it does | Best for |
| Unrestricted Access | The default. No filtering at all. Every website loads. | Devices that need no limits. |
| Limit Adult Websites | Automatically blocks most known adult sites. You can also add your own sites to block, and add safe sites to always allow. | Most people who want adult filtering plus a custom block list. |
| Only Approved Websites (called Allowed Websites Only on Mac) | Blocks the entire web except a short list of sites you approve. | Young children, classrooms, and tightly controlled devices. |
Two smaller lists sit inside the “Limit Adult Websites” mode and do the fine-tuning:
- Always Allow (the Allowed list on Mac): sites that should always open, even if the adult filter might block them.
- Never Allow (the Restricted list on Mac): sites you want blocked, even though they are not adult content. This is how you block a specific distracting site like a social network.
So if your goal is to block one or two specific websites, you will choose Limit Adult Websites and add those sites to Never Allow. If your goal is a locked-down, child-safe device, you will choose Only Approved Websites instead.
How To Block Specific Websites on Safari (iPhone and iPad)
Use these steps to block a chosen website on an iPhone or iPad. The path is the same on both.
- Open the Settings app and tap Screen Time.
- If you are setting this up for a child through Family Sharing, tap your child’s name first.
- Tap Content & Privacy Restrictions, then turn the switch on.
- Tap App Store, Media, Web, & Games, then tap Web Content.
- Tap Limit Adult Websites.
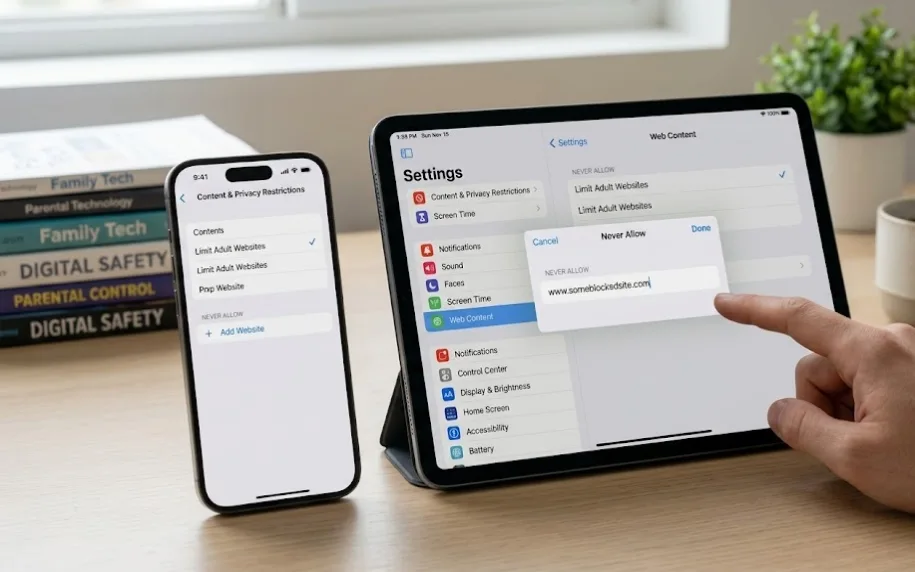
- Under Never Allow, tap Add Website.
- Type the address of the site you want to block, then tap done.
Repeat steps 6 and 7 for every site you want to block.
A practical example: to block a social media site, you would add it under Never Allow. From then on, Safari shows a “restricted” message when anyone tries to open it. There is usually a button to allow the site, but that button asks for the Screen Time passcode, which is why setting a passcode (covered below) matters so much.
What you will see after blocking: the next time someone visits that site in Safari, the page does not load. Instead, Safari displays a notice saying the site is restricted. Pages you did not block keep working normally.
Tip: add both the plain and “www” versions of an address if a block does not seem to stick (for example, the bare domain and the www. version). Some sites also use a mobile address, so add that too if needed.
How To Block Specific Websites on Safari (Mac)
The same controls live on a Mac, with slightly different menu names.
- Click the Apple menu, then choose System Settings.
- Click Screen Time in the sidebar. Turn it on if it is not already.
- If you are blocking sites for a child, click the Family Member pop-up menu and choose their account.
- Click Content & Privacy, then turn on the Content & Privacy switch at the top.
- Click App Store, Media, Web, & Games. (On older macOS versions this is called Content Restrictions.)
- Click the menu next to Access to Web Content and choose Limit Adult Websites.
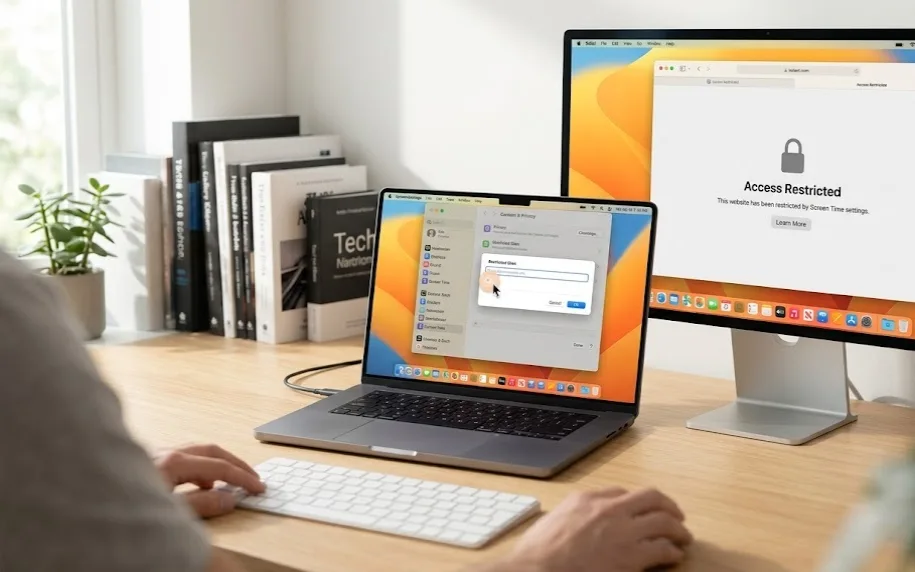
- Click Customize.
- Under the Restricted section, click the plus (+) button.
- Enter the website address and click OK.
- Click Done to save.
Verify it worked: open Safari and try to visit the site you blocked. The page should refuse to load and show a restricted message. If it still opens, see the troubleshooting section, since a cached copy or a missing “www” version is usually the cause.
How To Block Adult Websites in Safari

If your main goal is to keep adult content off a device, Apple makes this easy.
Choosing Limit Adult Websites turns on an automatic filter. Apple maintains a list of known adult sites and blocks them across Safari without you adding anything. This works the same on iPhone, iPad, and Mac, using the menus shown above.
Strengths:
- It is automatic. You do not have to find and list adult sites yourself.
- It works system-wide in Safari, not just on one page.
- It is free and built in.
Limitations to know:
- The filter is not perfect. It may occasionally let an adult site through, or block a safe site by mistake.
- It is most reliable inside Safari. It is not a guaranteed filter for every other app or browser on the device.
How to strengthen it: the filter pairs with the two lists you already met.
- If a harmful site slips past the filter, add it to Never Allow (the Restricted list on Mac).
- If a safe site is blocked by mistake, add it to Always Allow (the Allowed list on Mac).
For a child’s device, combining the automatic adult filter with a custom Never Allow list gives you strong, low-effort protection.
How To Allow Only Certain Websites
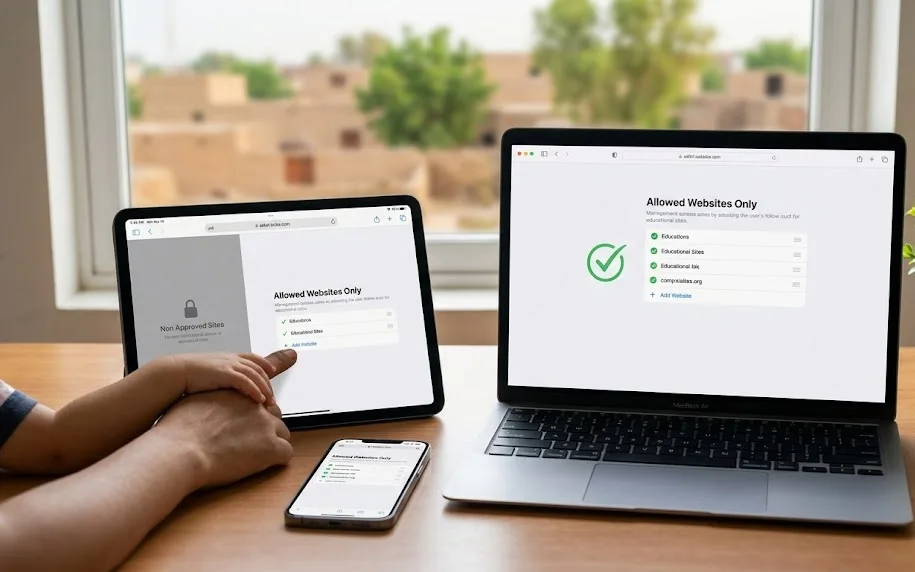
For the strictest setup, switch from blocking bad sites to allowing only good ones. This is sometimes called whitelist mode.
- On iPhone and iPad, choose Only Approved Websites in the Web Content menu.
- On Mac, choose Allowed Websites Only, then click Customize to manage the list.
In this mode, the whole web is blocked by default. Only the sites on your approved list will open in Safari. You add approved sites the same way you added blocked ones, using the plus button or Add Website.
When this mode shines:
- Young children: they can only reach the handful of sites you trust.
- Classrooms and study devices: a teacher can limit an iPad to a few learning sites, so students stay on task.
- Child-safe browsing: there is no guessing whether a filter caught a bad site, because nothing loads unless you approved it.
The trade-off is upkeep. You have to add every site the user legitimately needs, which can take a little time at first.
How To Create a Screen Time Passcode
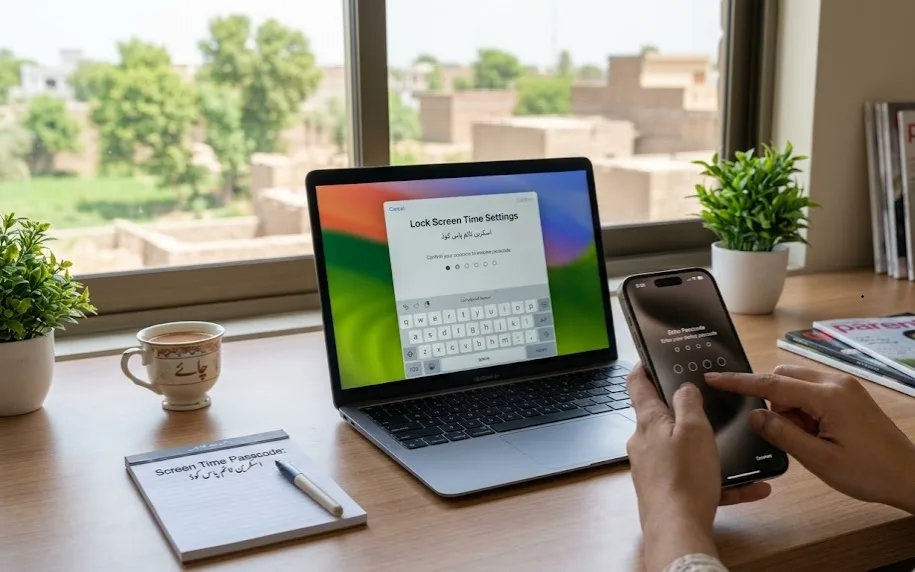
A Screen Time passcode is the single most important step for keeping your blocks in place. Without it, anyone can open Settings and turn your restrictions off in seconds. With it, the settings are locked behind a code.
Note that this is not the same as your device unlock passcode. It is a separate four-digit code just for Screen Time.
On iPhone or iPad:
- Open Settings and tap Screen Time.
- Scroll down and tap Lock Screen Time Settings.
- Enter a four-digit passcode, then enter it again to confirm.
- When asked, add a Screen Time Passcode Recovery by entering your Apple Account email or phone number.
On Mac:
- Open System Settings and click Screen Time in the sidebar.
- Scroll down and turn on Lock Screen Time Settings.
- Enter a four-digit passcode, then confirm it.
Best practices:
- Do not reuse your device unlock code. If a child knows that code, they could change your blocks.
- Always set up the Apple Account recovery option. If you ever forget the passcode, you can reset it with your Apple Account. Without recovery set up, a forgotten passcode is very hard to undo.
- For a child’s device managed through Family Sharing, set the passcode from the parent’s account so the child cannot remove it.
Common Problems and Fixes
Even a simple setup can hit a snag. Here are the issues people run into most, with practical fixes.
The website still opens after blocking it.
- Check the exact address. Add both the plain domain and the www version. Add the mobile address too if the site uses one.
- Confirm Content & Privacy Restrictions is actually switched on, not just configured.
- If you set this up for a child, make sure you selected the correct person under Family before adding the site.
A blocked site still loads the old page.
- Safari may be showing a saved copy from its cache. Clear Safari’s history and website data, then try again.
Restrictions are not saving or keep switching back.
- Tap or click Done to confirm changes before leaving the menu.
- Turn the Content & Privacy switch off and back on, then re-enter your sites.
- Restart the device and check that your iPhone, iPad, or Mac is running the latest software update, since outdated software can cause settings to behave oddly.
Screen Time does not seem to work at all.
- Make sure Screen Time itself is turned on.
- Confirm App & Website Activity is enabled, as some controls depend on it.
- Reboot the device and update the operating system if an update is available.
Changes are not showing up on your other devices.
- Turn on Share Across Devices (covered below) so settings sync.
- Confirm every device is signed in to the same Apple Account.
- Give the change a little time to sync, then restart the device if needed.
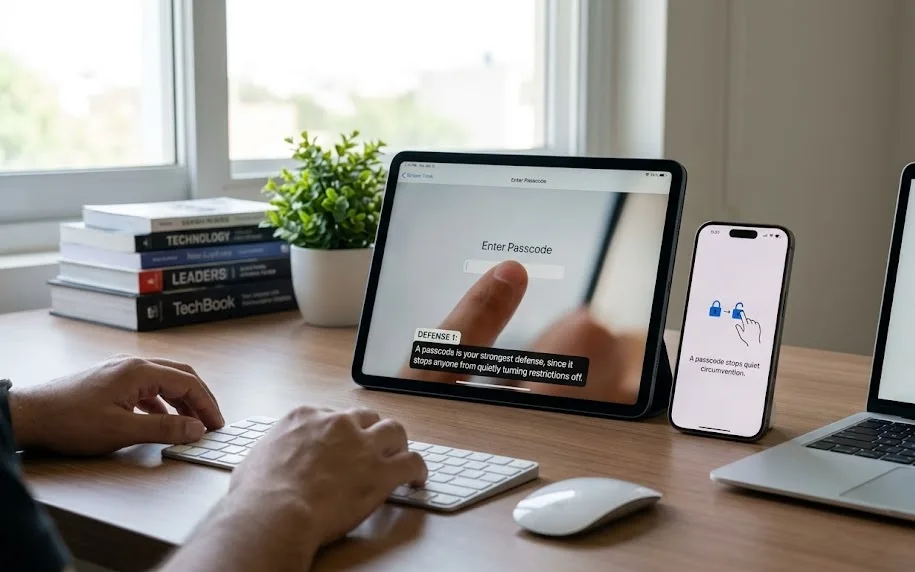
A determined user finds a way around a single blocked site.
- A passcode is your strongest defense, since it stops anyone from quietly turning restrictions off.
- For high-stakes situations like a young child’s device, switch to Only Approved Websites so nothing loads unless you approved it.
Keep Your Blocks Synced Across Devices
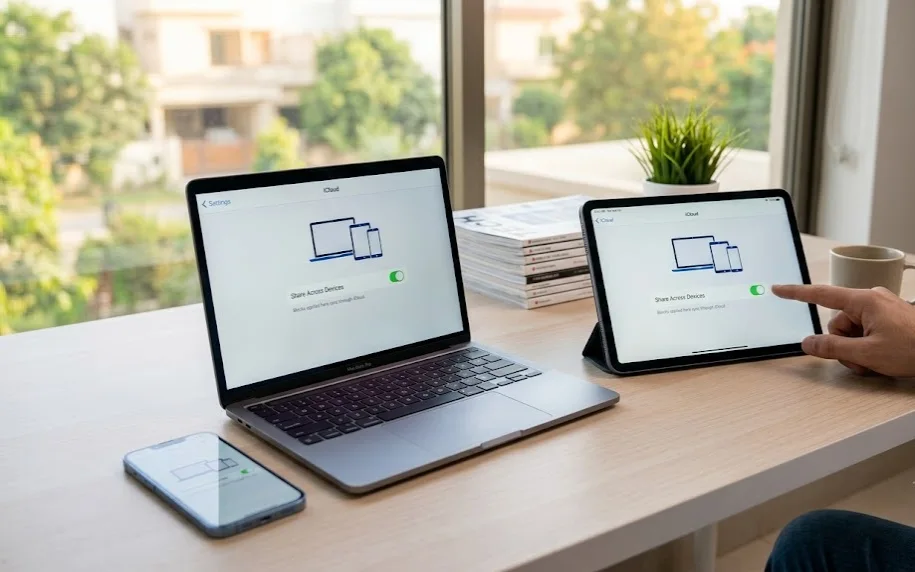
If you use more than one Apple device, you can set your rules once and have them apply everywhere.
- On your iPhone or iPad, open Settings and tap Screen Time.
- Scroll down and turn on Share Across Devices.
Now your Screen Time settings sync to every device signed in to the same Apple Account through iCloud. Block a site on your iPhone, and the same block applies on your iPad and Mac. This saves you from repeating the setup on each device.
Reduce Distractions With Time Limits Instead of a Full Block
Sometimes you do not want to block a site forever. You just want to stop visiting it during work or study hours. Screen Time can do that too, using App Limits for websites.
- On iPhone or iPad: go to Settings > Screen Time > App Limits > Add Limit, choose the Websites category, add the site, and set a daily time (one minute or more). When the time runs out, the site is blocked for the rest of the day and resets at midnight.
- On Mac: open System Settings > Screen Time > App Limits, add a limit for the Websites category, and enter the site.
This is a softer approach that works well for breaking a doom-scrolling habit without cutting a site off completely.
How To Unblock a Website Later
Removing a block is just as easy as adding one.
- iPhone or iPad: go to Settings > Screen Time > Content & Privacy Restrictions > App Store, Media, Web, & Games > Web Content, open your Never Allow list, swipe the site, and delete it. To remove all filtering, choose Unrestricted Access.
- Mac: go to System Settings > Screen Time > Content & Privacy > App Store, Media, Web, & Games > Web Content, click Customize, select the site in the Restricted list, click the minus (–) button, then click Done. To remove all filtering, set Access to Web Content to Unrestricted Access.
If you set a Screen Time passcode, you will need to enter it before making these changes.
Benefits of Blocking Websites Through Screen Time
Setting up these controls takes a few minutes and pays off in several ways.
- Parental control: keep children away from adult content and unsafe pages, with a passcode they cannot remove.
- Productivity: cut off the sites that interrupt deep work, so you finish tasks faster.
- Fewer distractions: a quick block, or a daily time limit, makes it far easier to stay focused.
- Safer browsing: filtering known adult sites reduces the chance of stumbling onto harmful content.
- No extra cost or apps: everything runs on tools your Apple device already has.
Frequently Asked Questions
Can Screen Time block websites permanently?
Yes. A site stays blocked until you remove it from the list yourself. Adding a Screen Time passcode makes the block hold, since no one can turn it off without the code.
Can users bypass website restrictions?
A passcode-protected block is hard to remove, because changing the settings requires the code. Determined users can sometimes find workarounds, so for a child’s device, use the Only Approved Websites mode and always set a passcode for the strongest protection.
Does blocking sync through iCloud?
Yes. Turn on Share Across Devices in Screen Time. Your rules then apply to every device signed in to the same Apple Account.
Can I block websites on Safari without installing apps?
Yes. Screen Time is built into iPhone, iPad, and Mac. You do not need to download or pay for anything to block sites in Safari.
How do I unblock a website later?
Return to the Web Content settings, open your blocked list, and remove the site. On iPhone or iPad you swipe to delete it; on Mac you select it and click the minus button. Enter your Screen Time passcode if prompted.
What is the difference between Limit Adult Websites and Only Approved Websites?
“Limit Adult Websites” blocks known adult sites automatically and lets you add your own sites to block or allow. “Only Approved Websites” blocks everything except a short list you approve, which is far stricter and best for young children.
I forgot my Screen Time passcode. What now?
If you set up Screen Time Passcode Recovery, go to Settings > Screen Time > Change Screen Time Passcode > Forgot Passcode? and reset it with your Apple Account. This is why adding the recovery option during setup is so important.
Final Thoughts
Blocking websites in Safari does not require special software or technical skill. Apple’s Screen Time gives you everything you need: block specific sites, filter adult content, lock down a device to approved sites only, set daily time limits, and sync it all across your devices.
The two steps that make the biggest difference are choosing the right Web Content mode for your needs and protecting it with a Screen Time passcode. Set those up once, and Safari becomes a calmer, safer place to browse, whether you are guiding a child, running a classroom, or simply trying to stay focused.